Abstract
This article aims at introducing what is internal network penetration, and how to achieve it with the open source project Frp on Github on Linux system.
What is Internal Network Penetration?
Internal network penetration, which is called Network Address Translation(NAT) penetration as well. It is used to build the connection between the device in public network and internal network.
Why we need Internal Network Penetration?
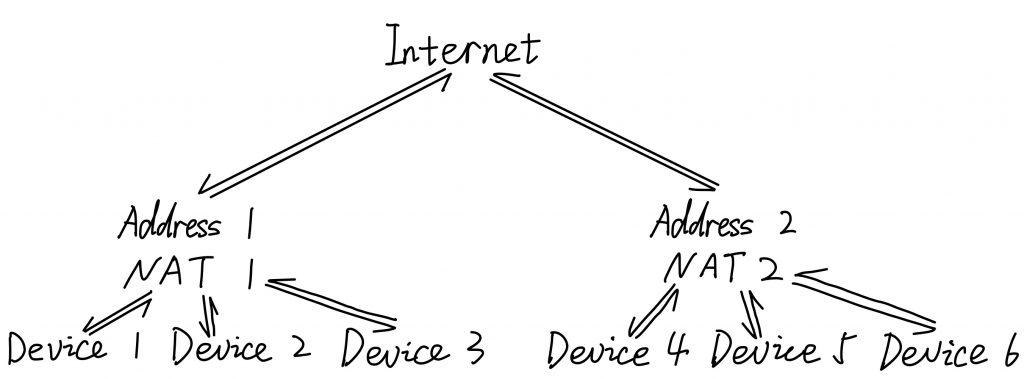
In order to access the internet, each device should have an address so that the communication between internet and device can be built, which the address is named public IP address. The public IP address are commonly used now is IPv4 address, with the format like xxx.xxx.xxx.xxx. With these addresses, different devices on the internet can access to the internet or access between each other. In the diagram below, Device 1, 2 and 3 can access to the internet, and they can access to each other across the internet as well.

However, with the increasing of devices access to the internet, the public IPv4 addresses are not enough to support so much devices. Therefore, to avoid this problem, network operators use Network Address Translation(NAT) techonology. It build a internal network with one public IPv4 address, and many devices in the internal sharing the same public IPv4 address to access the internet. In the diagram below, Device 1, 2 and 3 in NAT 1 can access to the internet with sharing IP address 1, and Device 4, 5 and 6 in NAT 2 can access to the internet with sharing IP address 2. However, because of NAT shielding, devices in two NAT cannot access to devices in another NAT because there is no specific IP address for each device in the same NAT.

To solve the problem, internal network penetration allows device in a NAT to be mapped to the public network, and accessed by any devices can access to the internet.
The most famous internal network penetration service is Ngrok, which the first generation project is opened on Github. However, the second generation is not an open source. Therefore, in this article, we use another open source internal network penetration service Frp instead.
What is Frp?
Frp is a fast reverse proxy to help you expose a local server behind a NAT or firewall to the internet. As of now, it supports tcp & udp, as well as http and https protocols, where requests can be forwarded to internal services by domain name.
The Github project: https://github.com/fatedier/frp
What can it do?
With Frp, we can map the service in internal network to the public network. For example, a web page is deploy on the raspberry pi in a internal network, we can map it on a cloud server with public IP address, and then we can access it by the public IP address.
Deploy Frp service
Requirement
- A service deploy on the
port_internalport of the device with internal IP addressip_internalin the internal network. Take raspberry pi with raspbian as example. - A server with independent public IP address
ip_public, and service map toport_publicport. Take CentOS 7 as example. - Frp server and client download from Github.
- Assume
port_internalis 7001,ip_internalis 192.168.123.101,ip_publicis 123.456.789.100,port_publicis 7010.
Step 1. Check internal network access
Check whether the service in internal network can be accessed by the web address: http://192.168.123.101:7001, make sure it can work correctly.
Step 2. Download Frp from Github
Download the latest or required version of Frp from Github, pay attention to the operating system.
Step 3. Deploy Frp server
Allow 7000 and 7010 port in firewall on the server management system.
Upload frps, frps.ini to the server, put them into dir ~/frp_server.
cd ~
mkdir frp_server
mv frps frp_server
mv frps.ini frp_server
Modify frps.ini:
# frps.ini
[common]
# frps server port
bind_port = 7000
Start frps:
./frps -c ./frps.iniStep 4. Deploy Frp client
Allow 7001 in firewall on raspberry pi, we use ufw to manage the firewall. Details of ufw firewall configuration, see my article below:
sudo ufw allow 7001
sudo ufw enable
Modify frpc.ini:
# frpc.ini
[common]
server_addr = 123.456.789.100
server_port = 7000                # Frp server port

[my_service]
type = tcp
local_ip = 192.168.123.101
local_port = 7001
remote_port = 7010
Start frpc:
./frpc -c ./frpc.iniStep 5. Access service with public IP
Now, we can access the service on internal network device by http://123.456.789.100:7010.
Attention
- The version of server and client of Frp should be match(in the same version).
- If the service can access in internal network but cannot access in public network, please make sure the firewall of the server with public IP allows the remote port.
The end
Above is the basic use of Frp internal network penetration, to use more functions of Frps, such as dashboard, udp , stcp, token, please check the README file of the Frp Github project at https://github.com/fatedier/frp.
Its like you read my mind! You seem to know a lot about this, like you wrote the book in it or something.
I think that you can do with some pics to drive the message home a bit, but instead of that, this is great blog.
A great read. I will certainly be back.
Everything is very open with a clear description of the issues.
It was definitely informative. Your website is extremely helpful.
Thanks for sharing!
Hmm it looks like your site ate my first comment (it was super
long) so I guess I’ll just sum it up what I had written and say, I’m thoroughly enjoying your blog.
I too am an aspiring blog blogger but I’m still new
to everything. Do you have any tips for rookie blog writers?
I’d definitely appreciate it.
What’s up, yeah this piece of writing is really pleasant and I have learned
lot of things from it regarding blogging. thanks.
This is a really good tip especially to those fresh to the blogosphere.
Brief but very precise info… Thanks for sharing this one.
A must read article!